
Popular categories
Looking for a yarn?


|
||||||||||||||||||||||
Sweet Almonds |
||||||||||||||||||||||
|
|
||||||||||||||||||||||
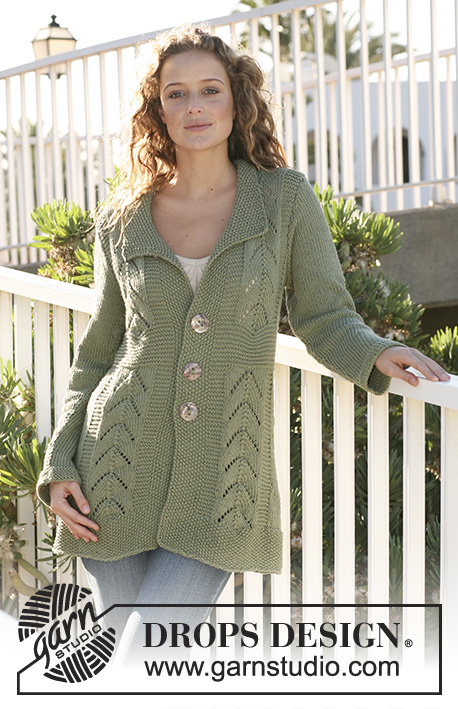
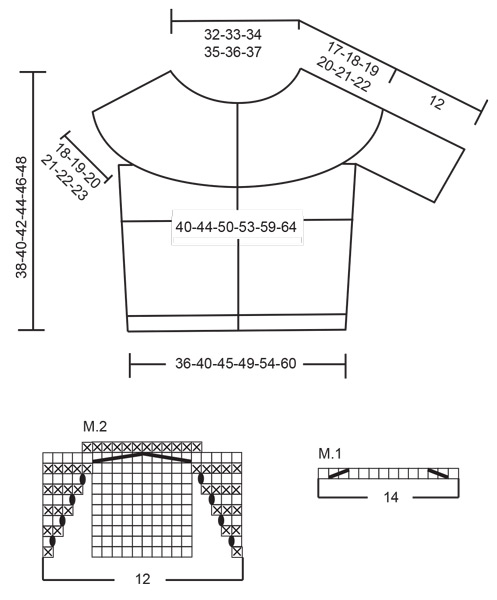
Knitted DROPS jacket with round yoke in ”Kid Silk”. Size S - XXXL.
DROPS 111-13 |
||||||||||||||||||||||
|
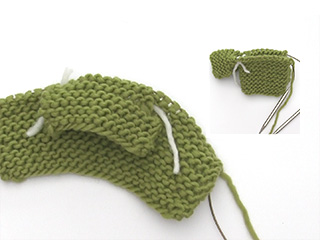
GARTER ST (back and forth on needle): K all rows. PATTERN: See diagram M.1 and M.2. The diagrams show the pattern from the RS. DECREASING TIP: Dec 1 st by each marker by K2 tog to the right and to the left of marker alternately (i.e. first dec made to the right of all markers, second dec to the left of all markers, etc). BUTTONHOLES: Make buttonholes on right front band. 1 buttonhole = cast off 5th and 6th st from mid front and cast on 2 new sts on return row. Make buttonholes when piece measures: SIZE S: 22, 27 and 32 cm SIZE M: 22, 28 and 34 cm SIZE L: 24, 30 and 36 cm SIZE XL: 24, 31 and 38 cm SIZE XXL: 25, 32 and 39 cm SIZE XXXL: 26, 34 and 42 cm. -------------------------------------------------------- BODY PIECE: Worked back and forth on circular needle. LOOSELY cast on 216-230-258-286-314-342 sts on circular needle size 3.5 mm with 1 thread Kid-Silk. Continue as follows from RS: P10, garter st across the row - see above - until 10 sts remain, P10 (P10 each side = front bands, P on every row throughout). After 6 rows work next row as follows from RS: P10, M.1 (= 14 sts) across the row until 10 sts remain, P10 = 188-200-224-248-272-296 sts. Work next row as follows from WS: P10, M.2 (= 12 sts) across the row until 10 sts remain, P10. After 1 vertical repeat of M.2, K 1 row from RS (work front bands as before), AT THE SAME TIME adjust no of sts to 186-202-228-246-270-296. Insert 2 markers in piece, 52-55-62-67-73-79 sts in from each side (back piece = 82-92-104-112-124-138 sts). Continue in stocking st with 10 front band sts each side as before. REMEMBER THE KNITTING TENSION! When piece measures 5 cm inc 1 st on each side of both markers and repeat the inc on every 3-3-3.5-3.5-4-4 cm a total of 5 times = 206-222-248-266-290-316 sts. When piece measures 21-22-23-24-25-26 cm LOOSELY cast off 10 sts each side for armhole (= 5 sts on each side of marker). Put piece aside and knit the sleeves. SLEEVE: Worked back and forth on needle. Cast on 66-68-72-74-76-78 sts (includes 1 edge st each side) on needle size 3 mm. Work garter st back and forth on needle. When piece measures 3 cm inc 1 st each side, and repeat the inc on every 1.5-1.5-1.5-1-0.5-0.5 cm a total of 4-5-5-7-8-9 times = 74-78-82-88-92-96 sts. When piece measures 12 cm cast off 6 sts each side = 62-66-70-76-80-84 sts left on needle. Put piece aside and knit the other sleeve. YOKE: Slip sleeves on the same circular needle as body piece where cast off for armholes = 310-334-368-398-430-464 sts. Change to circular needle size 3 mm. NOTE! Make BUTTONHOLES on right front band – see above! K 1 row from RS with front bands as before, AT THE SAME TIME dec 0-1-0-0-1-0 sts on row = 310-333-368-398-429-464 sts. K 1 row from WS. Insert 10-12-13-14-16-17 markers in piece as follows: first marker after 29-29-28-30-27-32 sts and the following markers with 28-25-26-26-25-25 sts between each = 29-29-28-30-27-32 sts left after the last marker. Now continue in garter st on all sts with front bands as before, AT THE SAME TIME dec 10-12-13-14-16-17 sts on every 8 row 3-4-4-4-5-5 times and then on every 6 row 9-8-9-10-9-10 times – SEE DECREASING TIP! AT THE SAME TIME when yoke measures approx 13-14-15-16-16-17 cm (measured from markers) slip 24-26-28-30-32-34 sts each side towards mid front on stitch holders for neck. Cast off to shape the neckline each side on every row from mid front: 3 sts 2 times, then 2 sts each side until yoke measures approx 17-18-19-20-21-22 cm (measured from markers – also cast off past markers at the sides). Piece now measures approx 38-40-42-44-46-48 cm. NECKLINE: Pick up approx 42-56 sts (incl sts on stitch holders) on each side of neckline on circular needle size 3 mm. K 1 row from WS on all sts, AT THE SAME TIME adjust no of sts to 176-180-186-190-198-200. Work 4 rows garter st, cast off LOOSELY. ASSEMBLY: Sew openings under arms and sew sleeve seams inside 1 edge st. Sew on buttons. |
||||||||||||||||||||||
Diagram explanations |
||||||||||||||||||||||
|
||||||||||||||||||||||
|
||||||||||||||||||||||
|
Have you made this or any other of our designs? Tag your pictures in social media with #dropsdesign so we can see them! Do you need help with this pattern?You'll find tutorial videos, a Comments/Questions area and more by visiting the pattern on garnstudio.com. © 1982-2024 DROPS Design A/S. We reserve all rights. This document, including all its sub-sections, has copyrights. Read more about what you can do with our patterns at the bottom of each pattern on our site. |
||||||||||||||||||||||


With over 40 years in knitting and crochet design, DROPS Design offers one of the most extensive collections of free patterns on the internet - translated to 17 languages. As of today we count 304 catalogues and 11422 patterns - 11422 of which are translated into English (UK/cm).
We work hard to bring you the best knitting and crochet have to offer, inspiration and advice as well as great quality yarns at incredible prices! Would you like to use our patterns for other than personal use? You can read what you are allowed to do in the Copyright text at the bottom of all our patterns. Happy crafting!
Comments / Questions (33)
Bonjour, je voudrais savoir si au moment des diminutions pour les emmanchures je dois comprendre la maille entre les 2 marqueurs? C'est a dire que dans les 10 diminutions la maille centrale est comprise ?
08.04.2024 - 14:56DROPS Design answered:
Bonjour Mme Deschamps, quand on doit rabattre les mailles des emmanchures à la fin du bas du gilet, on doit rabattre les 10 mailles sur chacun des côtés, soit 5 mailles avant + 5 mailles après chaque marqueur. On a 10 mailles pour l'emmanchure, les mailles des manches seront placées ici pour l'empiècement (cf vidéo). Bon tricot!
08.04.2024 - 15:32Je voudrais savoir si après avoir fini mon motif M2 , il est normal que j'ai 188 mailles. Vous dîtes d'ajuster à 186 mailles. Doit je diminuer mon rang de 2 mailles Merci de votre réponse
02.04.2024 - 20:47DROPS Design answered:
Bonjour Mme Deschamps, tout à fait, vous devez avoir 188 mailles au dernier rang de M.2, tricotez le rang suivant à l'endroit sur l'endroit en diminuant 2 mailles à intervalles réguliers (ne diminuez pas dans les mailles de bordure des devants - cf cette leçon) pour avoir 186 mailles. Bon tricot!
03.04.2024 - 08:38Bonjour, je voudrais savoir si le jeté du diagramme M2 se fait sur le rang endroit où envers ? Merci de votre réponse
31.03.2024 - 21:16DROPS Design answered:
Bonjour Mme Deschamps, le 1er rang de M.2 est un rang sur l'envers, autrement dit, les rangs avec les jetés sont des rangs sur l'endroit. Bon tricot!
02.04.2024 - 14:51Bonjour, je suis arrivée à l empiècement ; il est précisé de diminuer 10 m 3fois tous les 8 rang (pour ma taille) . pas de problème. Mais il est dit d'aller à "diminutions" et où l on précise de diminuer une maille à droite et une maille à gauche des marqueurs . or il y a 10 marqueurs, cela fait 20 diminutions et non 10... de plus ces diminutions doivent elle être faites dès le début de l empiècement ou doit on les commencer au bout des 8 rangs?
15.12.2018 - 15:38DROPS Design answered:
Bonjour Mme Blanquet, on doit diminuer 1 m à chaque marqueur soit 10 diminutions par rang, la 1ère fois, vous diminuez à droite de chacun des marqueurs (= avant chaque marqueur), la fois suivante, vous diminuez à gauche de chacun des marqueurs (= après chaque marqueur). Bon tricot!
17.12.2018 - 09:43Vorrei eseguire il modello in cotton viscose per taglia M....quanto filato devo acquistare...sono un po imbranata e non riesco a fare i calcoli ;-) Grazie mille
17.03.2017 - 18:00DROPS Design answered:
Buonasera Raffaella. Usando Kid Silk avrà bisogno di 3 gomitoli pari a 200 metri (metri in un gomitolo) X 3 gomitoli= 600 metri. I gomitoli di Cotton Viscose corrispondono a 110 metri l'uno: quindi 600 m : 110 = 5,5 gomitoli, quindi 6 gomitoli . Buon lavoro!
17.03.2017 - 19:38J'ai finalement réussi à tricoter ce joli petit gilet mais je n'avais pas assez de laine. J'avais commandé 75 gr pour la taille S et heureusement ma soeur m'a dépanné avec une pelote à elle. Ce qui m'a permis de tricoter la dernière dizaine de rangs.
26.09.2016 - 13:30Bonsoir, Je ne comprends pas les explications suivantes : "EN MÊME TEMPS, ........ Rabattre ensuite de chaque côté tous les rangs à partir de l'encolure : 2 fois 3 m, puis 2 m jusqu'à environ 17- cm (mesuré à partir des marqueurs – rabattre également les mailles avec les marqueurs de chaque côté de l'encolure)." Merci pour votre aide
12.09.2016 - 20:19DROPS Design answered:
Bonjour Laurent, vous rabattez maintenant au début de chaque rang à partir de l'encolure (= de chaque côté): 2x 3 m, puis vous rabattez 2 m de chaque côté jusqu'à ce que l'ouvrage mesure 17 cm depuis les marqueurs. En rabattant ces mailles, vous passerez les marqueurs placés près de l'encolure. Bon tricot!
13.09.2016 - 09:15Buongiorno vorrei sapere se le 10 maglie del bordo sono lavorare a rovescio anche al rovescio del lavoro oppure a maglia rasata rovescia, viste dal diritto del lavoro. Grazie
08.07.2016 - 05:59DROPS Design answered:
Buongiorno Monica. Le 10 m dei bordi davanti sono lavorate sempre a rov, anche sui ferri sul rovescio del lavoro. Buon lavoro!
08.07.2016 - 06:50Salve, vorrei conferma che il golfino vada lavorato sia con i ferri 3, 5 (per il corpo) che con i ferri 3 (per le maniche e per lo sprone). Grazie e complimenti
05.07.2016 - 05:56DROPS Design answered:
Buongiorno Monica, i ferri indicati sono 3,5 mm per il corpo e 3 mm per le maniche. Si ricordi sempre di controllare il campione, se non corrisponde a quello indicato deve adeguare la misura dei ferri. Buon lavoro!!
05.07.2016 - 07:26Angelina Birch wrote:
I am confused as to the place to cast off for the armholes, it doesn't say where just cast off 10 sts each side
24.05.2015 - 17:35DROPS Design answered:
Dear Mrs Birch, you cast off 5 sts on each side of each marker, ie the 2 markers placed earlier, where you have inc each side of them. Happy knitting!
26.05.2015 - 10:08