
Popular categories
Looking for a yarn?


|
|||||||||||||
Sandy Bay |
|||||||||||||
 |
 |
||||||||||||
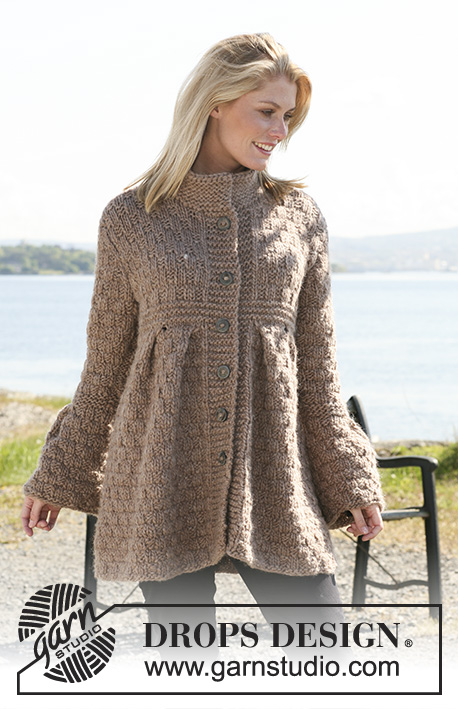
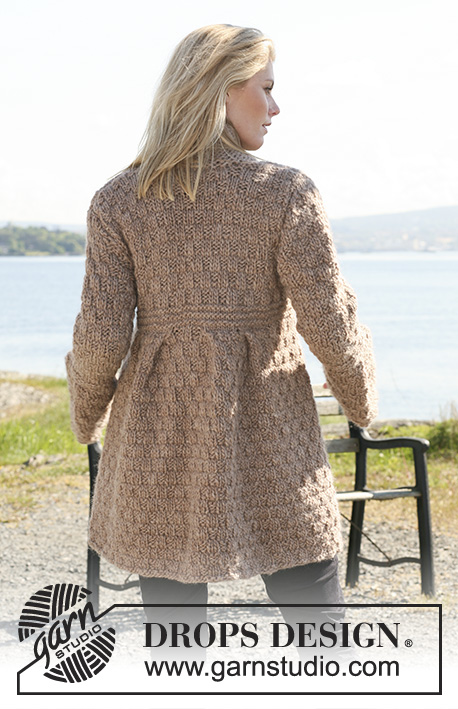
DROPS jacket with pleats in textured pattern in ”Snow”. Size S - XXXL.
DROPS 109-14 |
|||||||||||||
|
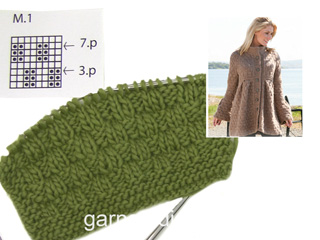
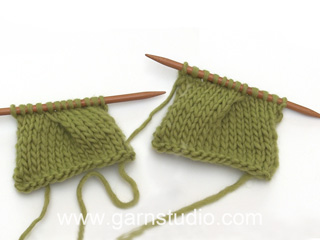
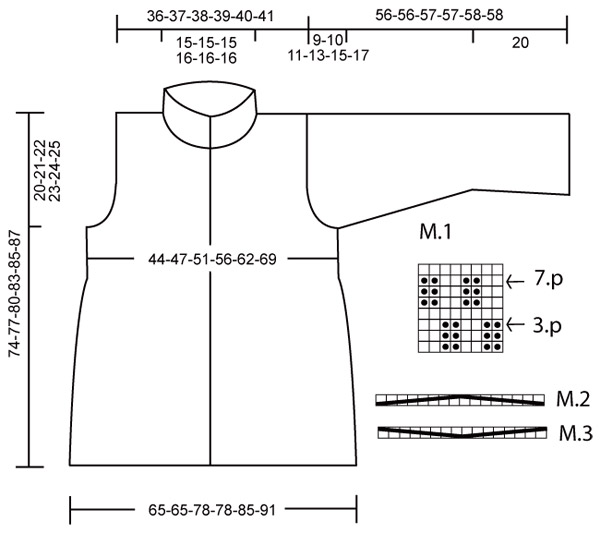
Measuring tip: Because of the weight of the yarn all measurements should be made whilst the garment is hanging, otherwise it will be too long when worn. Garter st, back and forth on needle: K all rows. Garter st, in the round: K 1 round, P 1 round. Pattern: See diagram M.1. Buttonholes: Cast off for buttonholes on right front piece. 1 buttonhole = cast off 4th st from mid front and cast on 1 new st on return row. Cast off for buttonholes when piece measures: Size S: 17, 27, 37, 47, 57 and 67 cm. Size M: 20, 30, 40, 50, 60 and 70 cm. Size L: 23, 33, 43, 53, 63 and 73 cm. Size XL: 16, 26, 36, 46, 56, 66 and 76 cm. Size XXL: 18, 28, 38, 48, 58, 68 and 78 cm. Size XXXL: 20, 30, 40, 50, 60, 70 and 80 cm. Pleats: See diagram M.2 and M.3. The pleats are worked in the Pattern on the 3rd or 7th row of diagram M.1. Increasing tip: Inc 1 st by making 1 YO. Work YO into back of loop on return row to avoid a hole. Knitting tip: When turning mid piece, slip 1 st as if to K. Tighten thread and work return row (to avoid a hole). Jacket: Worked back and forth on circular needle from mid front. Cast on 160-160-188-188-204-216 sts on circular needle size 8 mm. P 1 row, K 2 rounds. Work next row from WS as follows: 7 garter sts – see above – P 1, Pattern M.1 until 8 sts remain, and finish with P1, 7 garter sts (8 sts each side = front bands, work front bands in 7 garter sts and K1 from RS/ P1 from WS throughout). Continue in Pattern like this. Remember buttonholes – see above. See Measurement tip! When piece measures approx 39-40-41-42-42-42 cm (adjust so that next row is the 3rd or 7th row in Pattern) work Pleat on next row from WS – see above – as follows: work front band (8 sts), 2 sts in Pattern, then 2 repeats of M.2, 18-18-18-18-26-32 sts in Pattern, then M.3 1-1-2-2-2-2 times, 8-8-4-4-4-4 sts in Pattern, M.2 1-1-2-2-2-2 times, 18-18-18-18-26-32 sts in Pattern, then M.3 2 times, 2 sts in Pattern, and finish with front band (8 sts) = 112-112-124-124-140-152 sts. The Pleats now sit towards each other mid front and mid back. Change to circular needle size 7 mm and work 6 rows garter st on all sts, at the same time inc 0-8-4-16-12-16 sts evenly on last row = 112-120-128-140-152-168 sts. Insert a marking Thread (MT) 32-34-36-39-42-46 sts in from each side (back piece = 48-52-56-62-68-76 sts). Change to needle size 8 mm and continue in Pattern (M.1), with 8 front band sts each side. When piece measures 54-56-58-60-61-62 cm cast off 3 sts on each side of both MT for armhole and complete each piece separately. Back piece: = 42-46-50-56-62-70 sts. Cast off to the shape the armhole each side at the beg of every row: 2 sts 0-0-1-2-3-4 times and 1 st 1-2-2-2-3-4 times = 40-42-42-44-44-46 sts. When piece measures 72-75-78-81-83-85 cm cast off the middle 14-14-14-16-16-16 sts for neck and dec 1 st on neckline on next row = 12-13-13-13-13-14 sts left on each shoulder. Cast off when piece measures 74-77-80-83-85-87 cm. Left front piece: = 29-31-33-36-39-43 sts. Cast off for armhole at side as described for back piece, at the same time continue in Pattern and garter st. When piece measures 69-72-75-78-80-82 cm cast off 10-10-10-11-11-11 sts towards mid front for neck. Cast off to shape the neckline on every other row: 2 sts 2 times and 1 st 2 times = 12-13-13-13-13-14 sts left on shoulder. Cast off when piece measures 74-77-80-83-85-87 cm. Right front piece: Like left front piece, but mirrored. Continue to cast off for buttonholes. Sleeve: Worked in the round on double pointed needles. Cast on 48-48-48-52-52-52 sts on needle size 8 mm. Work 2 rows garter st – see above. Insert a Marking Thread (MT) at beg of round. Continue in Pattern (M.1). When piece measures 20 cm (adjust so that next row is the 3rd or 7th row in diagram M.1) work next round as follows: 8-8-8-10-10-10 sts in Pattern, then M.2 2 times, finish with 8-8-8-10-10-10 sts in Pattern = 32-32-32-36-36-36 sts. Change to needle size 7 mm and work 6 rounds garter st, at the same time dec 2 sts evenly on the last round = 30-30-30-34-34-34 sts. Change to needle size 8 mm and continue in Pattern with 1 P st on each side of MT. When piece measures 23 cm inc 1 st on both sides of the 2 P sts by MT and repeat the inc on every 6-4-3-3.5-2.5-2 cm a total of 4-6-7-6-8-9 times = 38-42-44-46-50-52 sts. See Increasing tip! Incorporate inc sts in Pattern as you go along (no of sts will not always fit the pattern). When piece measures 47-46-46-44-43-41 cm - less on the larger sizes because of longer sleeve cap and wider shoulders – cast off the 2 P sts and 2 sts on each side of these = 32-36-38-40-44-46 sts and now complete piece back and forth on needle. Cast off to shape the sleeve cap each side at the beg of every row: 2 sts 1 time, 1 st 2-4-4-5-7-8 times, then 2 sts each side until piece measures 55-55-56-56-57-57 cm, now cast off 3 sts each side 1 time and cast off remaining sts. Sleeve measures approx 56-56-57-57-58-58 cm. Work the other sleeve with M.3 for Pleats. Sew shoulder seams. Neckline: Pick up 56-56-56-58-58-58 sts from RS round neck with 1 thread Snow on circular needle size 8 mm. Change to needles size 7 mm and continue with 2 threads Snow as follows: K 1 row from WS and now work shortened rows as follows: * K 1 row on 41-41-41-42-42-42 sts, turn the piece – see above – K 1 row on 26 sts for all sizes, turn piece, K 1 row on 41-41-41-42-42-42 sts, turn piece, K 1 row on all sts *, repeat from *-* until neckline measures 5 cm. Now work 4 rows garter st on all sts. Collar measures approx 7 cm (on the shorter side). Cast off. Assembly: Set in sleeves. Sew on buttons. |
|||||||||||||
Diagram explanations |
|||||||||||||
|
|||||||||||||
|
|||||||||||||
|
Have you made this or any other of our designs? Tag your pictures in social media with #dropsdesign so we can see them! Do you need help with this pattern?You'll find tutorial videos, a Comments/Questions area and more by visiting the pattern on garnstudio.com. © 1982-2024 DROPS Design A/S. We reserve all rights. This document, including all its sub-sections, has copyrights. Read more about what you can do with our patterns at the bottom of each pattern on our site. |
|||||||||||||


With over 40 years in knitting and crochet design, DROPS Design offers one of the most extensive collections of free patterns on the internet - translated to 17 languages. As of today we count 304 catalogues and 11422 patterns - 11422 of which are translated into English (UK/cm).
We work hard to bring you the best knitting and crochet have to offer, inspiration and advice as well as great quality yarns at incredible prices! Would you like to use our patterns for other than personal use? You can read what you are allowed to do in the Copyright text at the bottom of all our patterns. Happy crafting!
Comments / Questions (131)
Hallo, also bei der Größe S habe ich 18 x Eskimo bestellt es reicht aber nicht, wäre schön wenn man bei Gr. S die Grammzahl erhöht
28.10.2020 - 15:41Meine Frage an Sie.Haben Sie eine Anleitung für ein Faltenstrick Kleid.Würde mich über eine Antwort freuen.Anleitung auch gerne von bezahlen.Mfg.Barbara Hirch
29.01.2020 - 15:23DROPS Design answered:
Liebe Frau Hirch, hier finden Sie alle unsere Modellen mit "Falten". Hoffentlich hilft es Ihnen. Viel Spaß beim stricken!
29.01.2020 - 15:57Thank you for all of your help. I am finished with my project and it looks great! Thank again, Kim
20.01.2019 - 16:33Almost finished with this project and could not have done it without your help. I want to thank you so much. I need help with the neckline. You have 56 on needle but on knitting 41 on one row and 26 on rows, that doesn't equal the 56 stitches you picked up. I haven't done shortened rows before and need some guidance to get the collar done.
12.01.2019 - 22:50DROPS Design answered:
Dear Kim, you will work short rows over these 56 sts: work first the 41 first sts, turn and work 26 sts on next row, turn and work 41 sts, turn and work all 56 sts. Repeat these 4 rows (you'll have 15 sts, 26 sts, 15 sts = 56 sts). Happy knitting!
14.01.2019 - 10:44OK. Mais les marqueurs se trouvent bien en dessous des emmanchures (plusieurs cm)
08.01.2019 - 11:20DROPS Design answered:
Bonjour Mme Leycuras, les marqueurs servent de repères entre les mailles (pas en hauteur), on va effectivement tricoter quelques cm avant de diviser l'ouvrage/rabattre les mailles des emmanchures. Bon tricot!
08.01.2019 - 11:50Merci pour votre réponse, mais je ne comprends pas l'utilité des marqueurs à cet endroit Merci
08.01.2019 - 10:20DROPS Design answered:
Bonjour Mme Leycuras, ces marqueurs, à 32-34-36-39-42-46 m de chaque côté, servent de repères aux côtés de la veste = on a ainsi 48-52-56-62-68-76 m pour le dos entre les marqueurs. C'est à ces marqueurs que l'on va ensuite rabattre les mailles des emmanchures, soit 3 m avant et 3 m après chacun de ces marqueurs, avant de terminer chaque partie séparément. Bon tricot!
08.01.2019 - 11:14Bonjour, je ne comprend pas, si après avoir positionne les marqueurs au dos,(après les 6 rgs de point mousse) il faut continuer sur les 124 m, ou faire dos et côtés séparément. Merci
07.01.2019 - 16:35DROPS Design answered:
Bonjour Mme Leycuras, au dernier des 6 rangs point mouisse, répartissez 4-16 augmentations (cf taille) puis placez un marqueur à 36-39 m des bords (repères côtés) et continuez avec l'aiguille 8 en suivant M.1 et avec 8 m de bordure devant de chaque côté. Vous divisez ensuite l'ouvrage à 58-60 cm en rabattant 3 m de chaque côté de chacun des marqueurs (= 6 m pour chaque emmanchure) et terminez maintenant chaque partie séparément. Bon tricot!
08.01.2019 - 08:26I need to decrease sleeves to 20 inches. How do you recommend I accomplish this? I increased every 2 inches instead of 2 3/8. Will that work?
26.12.2018 - 22:39DROPS Design answered:
Dear Kim, you can also start to increase earlier and then repeat the increase as stated for the size. Happy knititng!
02.01.2019 - 10:05Left front piece: bind off 10 sts towards mid front for neck? 29 stitches where are the 10 mid front , How many do you follow in the pattern to bind off ten. What is considered mid front for the neck. Tell me how many to knit and when to bind off within the 29 stitches
15.12.2018 - 18:40DROPS Design answered:
Dear Kim, on left front piece, the 10 sts for neck are the first 10 sts at the beg from WS: when piece measures 69-72-75 cm, bind off the first 10 sts at the beg of next row from WS, work row to end, then turn, work next row from RS, at the beg of next row from WS bind off 2 sts, etc. Happy knitting!
17.12.2018 - 09:46I dont know if you got my other question about the odd number of stitches for the left and right front 29. the pattern M1 is an even number of stitches, what do I need to do? Please help.
14.12.2018 - 03:21DROPS Design answered:
Dear Kim, when working left front piece continue with the 8 front band sts as before, and work M.1 over the remaining sts starting from the first st in diagram and repeat M.1 a total of 2 times in width, then work the first 4 sts and finish with 1 edge stitch (for sleeve seams). Happy knitting!
14.12.2018 - 08:54