
Popular categories
Looking for a yarn?


|
|
DROPS 109-19 |
|
|
|
|
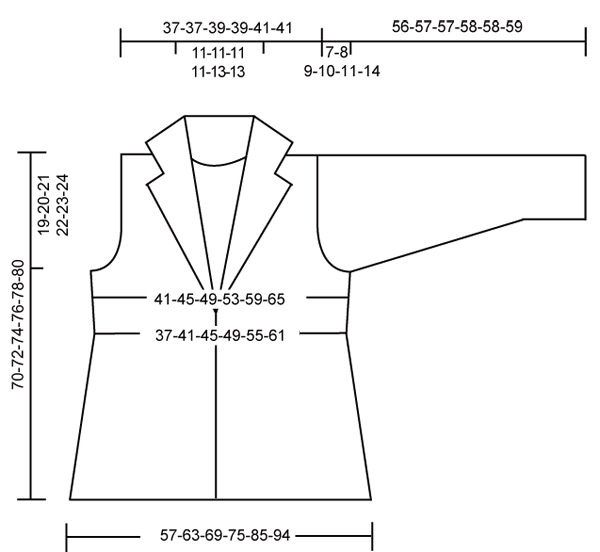
DROPS jacket in ”Symphony” in moss st. Size S - XXXL.
DROPS 109-19 |
|
|
Garter st back and forth on needle: K all rows. Moss st: Row 1: *K1, P1 *, repeat from *-*. Row 2: K over P, P over K. Repeat row 2. Measurement tip: Because of the weight of the yarn make all measurements when garment is hanging, otherwise it will be too long when worn. Buttonholes: Cast off for buttonholes on right front piece. 1 buttonhole = cast off 3rd st from mid front and cast on 1 new st on return row. Cast off for buttonholes when piece measures: Size S: 40 and 46 cm. Size M: 40 and 46 cm. Size L: 40 and 47 cm. Size XL: 40 and 47 cm. Size XXL: 40 and 48 cm. Size XXXL: 40 and 48 cm. Back piece: Worked back and forth on needle. Cast on 76-84-92-100-112-124 sts (includes 1 edge st each side) on needle size 8 mm with 1 thread Symphony. P 1 row from WS and then work 2 rows garter st – see above. Continue in stocking st. Remember the knitting tension! When piece measures 35 cm – see Measurement tip – work next row as follows from the RS with 2 threads: 1 edge st, * K2 tog, P2 tog *, repeat from *-* and finish with K2 tog and 1 edge st = 39-43-47-51-57-63 sts. Continue in moss st and 2 threads – see above. When piece measures 40 cm inc 1 st each side and repeat the inc when piece measures 45-46-47-48-49-50 cm = 43-47-51-55-61-67 sts. When piece measures 51-52-53-54-55-56 cm cast off for armhole each side at the beg of every row: 3 sts 1 time, 2 sts 0-1-1-2-2-3 times and 1 st 0-0-1-1-3-4 times = 37-37-39-39-41-41 sts. When piece measures 68-70-72-74-76-78 cm cast off the middle 9-9-9-9-11-11 sts for neck and dec 1 st on neckline on next row = 13-13-14-14-14-14 sts left on each shoulder. Cast off when piece measures 70-72-74-76-78-80 cm. Right front piece: Worked back and forth on needle. Cast on 42-46-50-54-60-66 sts (includes 1 edge st at side and 5 front band sts towards mid front) on needle size 8 mm with 1 thread Symphony. P 1 row from WS, and then work 2 rows garter st. Continue in stocking st with 5 moss sts towards mid front (= front band). When piece measures 35 cm continue as follows from the RS with 2 threads: 5 moss sts, * K2 tog, P2 tog *, repeat from *-* and finish with 1 edge st = 24-26-28-30-33-36 sts. Continue in moss st with 2 threads. Now read all of the following section before continuing! When piece measures 40 and 45-46-47-48-49-50 cm inc at side as described for back piece. Remember buttonholes – see above. At the same time when piece measures 48-48-50-50-52-52 cm inc 1 st towards mid front on every 4-4-4-5-5-5 cm a total of 4 times. At the same time when piece measures 51-52-53-54-55-56 cm cast off for armhole at side as described for back piece. At the same time when piece measures 62-64-66-68-70-72 cm cast off the outermost 7 sts on front band, work remaining sts on row. At the end of next row cast on 5 new sts towards mid front. After all inc and dec are complete there are 25-25-26-26-27-27 sts on row. When piece measures 70-72-74-76-78-80 cm cast off 13-13-14-14-14-14 sts on shoulder from the WS and work remaining 12-12-12-12-13-13 sts on row = collar. Now work shortened rows for collar as follows (first row = RS): * work 2 rows garter st on 6-6-6-6-7-7 sts only, work 2 rows garter st on all sts *, repeat from *-* until collar measures 7-7-7-7-8-8 cm (measured on the shorter side) from shoulder. Cast off loosely. Left front piece: Like right front piece, but mirrored and without buttonholes Sleeves: Worked in the round on double pointed needles. Cast on 23-23-25-25-27-27 sts on double pointed needles size 8 mm with 2 threads Symphony. Insert a Marking Thread (MT) at beg of round. Work moss st until piece measures 10 cm. Now continue with 1 thread, but work 1 st in each thread from previous round to double no of sts = 46-46-50-50-54-54 sts. Work stocking st. When piece measures 49-49-48-48-47-45 cm (less on the larger sizes because of longer sleeve cap and wider shoulder) cast off 3 sts of each side of MT for armhole and complete piece back and forth on needle. Cast off to shape the sleeve cap each side at the beg of every row: 2 sts 2-2-3-3-3-3 times, 1 st 0-0-0-0-1-3 times, then 2 sts each side until piece measures 55-56-56-57-57-58 cm, now cast off 3 sts each side 1 time and cast off remaining sts. Sleeve measures approx 56-57-57-58-58-59 cm. Assembly: Sew shoulder seams. Sew side seams inside 1 edge st. Set in sleeves. Sew collar tog mid back and sew to neckline. Sew on buttons. |
|
|
|
|
Have you made this or any other of our designs? Tag your pictures in social media with #dropsdesign so we can see them! Do you need help with this pattern?You'll find tutorial videos, a Comments/Questions area and more by visiting the pattern on garnstudio.com. © 1982-2024 DROPS Design A/S. We reserve all rights. This document, including all its sub-sections, has copyrights. Read more about what you can do with our patterns at the bottom of each pattern on our site. |


With over 40 years in knitting and crochet design, DROPS Design offers one of the most extensive collections of free patterns on the internet - translated to 17 languages. As of today we count 304 catalogues and 11422 patterns - 11422 of which are translated into English (UK/cm).
We work hard to bring you the best knitting and crochet have to offer, inspiration and advice as well as great quality yarns at incredible prices! Would you like to use our patterns for other than personal use? You can read what you are allowed to do in the Copyright text at the bottom of all our patterns. Happy crafting!
Comments / Questions (21)
Hej. Jeg har købt garnet Melody til denne opskrift. Skal jeg med denne garn også bruge 1 tråd i noget af opskriften og 2 tråde i andet af opskriften?
01.02.2021 - 17:01DROPS Design answered:
Hej Hanne, jakken er strikket med 2 tråde i perlestrik på bærestykket for at få det mere fast/kompakt. Det kan du også gøre med DROPS Melody, men sørg for at overholde strikkefastheden som står i opskriften. God fornøjelse!
03.02.2021 - 10:25Hei :) Jeg strikker Drops jakke i Symphony nr. 109-19 i garnet Melody størrelse XXL. (drops design: model nr. WW-024). Er kommet til høyre forstykket og lurer på hva som menes med "økes det 1 m mot midt foran på hver". Altså hvor er "mot midt foran" egentlig? Midt på forstykket eller mer mot stolpen? Jeg har 34 masker etter økningen i siden og hvis det skal være økning mot midt foran, så lurer jeg på om det er rundt maske nr. 17 jeg skal ha denne økningen? Mvh Elaine
16.01.2016 - 17:01DROPS Design answered:
Hej Elaine. Midt foran er i dette mönster ved siden af stolpen, dv, du strikker de 5 stolpemasker, ök 1 m, strik resten af pinden
20.01.2016 - 15:29Zou je de mouwen ook met rondbreinaald kunnen maken? En zo ja is dit evt anders?
12.09.2015 - 17:11DROPS Design answered:
Hoi Michelle, ja, je kan ook de mouwen in de rondte breien op rondbreinaald ipv breinaalden zonder knoop. Je kan een kleine gebruiken (40 cm) of de magic loop techniek:
14.09.2015 - 14:03På tengningen ser det ut som man skal legge ut masker fortløpende på armene, men i oppskriften skal man ikke gjøre det.stemmer det at man ikke skal gjøredet?
19.01.2015 - 19:52DROPS Design answered:
Hei Mona. Du skal fölge opskriften. Du skal ikke legge ut masker fortlöepende.
22.01.2015 - 16:33Ich wollte noch gerne ein paar Sachen in "Symphony" stricken. Leider kann ich die Wolle nicht mehr auftreiben. Wäre es möglich, bevor die Wolle aus dem Programm kommt, einen deutlichen Hinweis bei der Auflistung der Wollsorten zu machen, damit man noch rechtzeitig reagieren kann? Vielleicht können Sie mir auch sagen, wo ich noch nach diversen Farben fragen kann?
29.07.2014 - 08:20DROPS Design answered:
Liebe Marion, am besten schauen Sie immer mal wieder auf der Garnqualitäten-Seite, dort ist immer bei den Farben rechtzeitig markiert, wenn sie aus dem Programm genommen werden. Für Symphony können Sie bei Lanade noch ein paar Reste bestellen, oder Sie fragen bei "Mein Wollkontor" telefonisch an, beide Händer finden Sie unter "Händler".
29.07.2014 - 09:26No entiendo la disminución en la sisa, la primera vuelta se disminuyen 3 puntos a vez, pero 2 ptos 0-1-1-2-2-3, esto último es lo que no entiendo, me podríais ayudar, gracias
12.04.2014 - 19:50DROPS Design answered:
Hola Ana. 0-1-1-2-2-3 - estos números indican cuantas veces tienes que hacer las dism de 2 pts según la talla. Hay 6 números porque son 6 tallas (S-M-L-XL-XXL-XXXL) es decir, por ejemplo, para la talla S = 0 y se pasa directamente a la sig. dism; para la M: 1vez; para la L: 1 vez; para la XL: 2 vcs...etc.
14.04.2014 - 17:05Die angegebende Maschenzahl für die Ärmel können so nicht stimmen. 25M auf vier Nadeln verteilt sind zu wenig, 4mal 25 sind zu viel.
29.01.2013 - 11:46DROPS Design answered:
Hallo Britta, die Maschenzahl stimmt. Es wird zunächst mit doppeltem Faden gestrickt, nachher (wenn man nur noch mit 1 Faden strickt) wird die Maschenzahl verdoppelt.
29.01.2013 - 13:11Once and plan to have a second one in another colour - my absolutely favourite design ever :)
12.02.2012 - 11:50A very flattering design. I can see myself knitting this for my first garment....
07.09.2008 - 02:20Lovely!
14.07.2008 - 23:09