
Popular categories
Looking for a yarn?


|
|||||||||||||
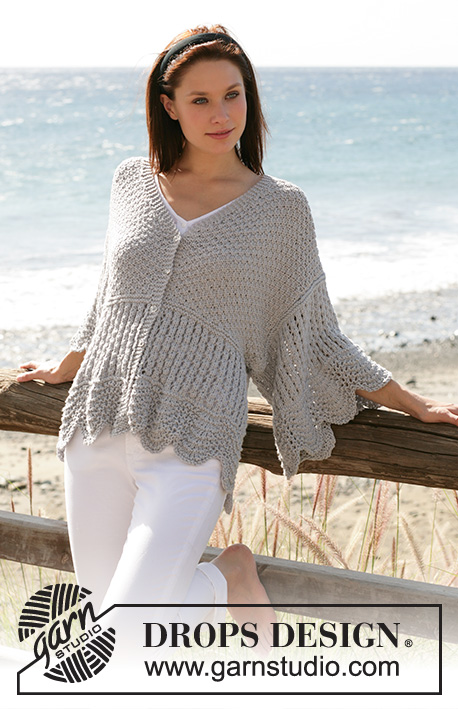
DROPS 101-30 |
|||||||||||||
|
|
|||||||||||||
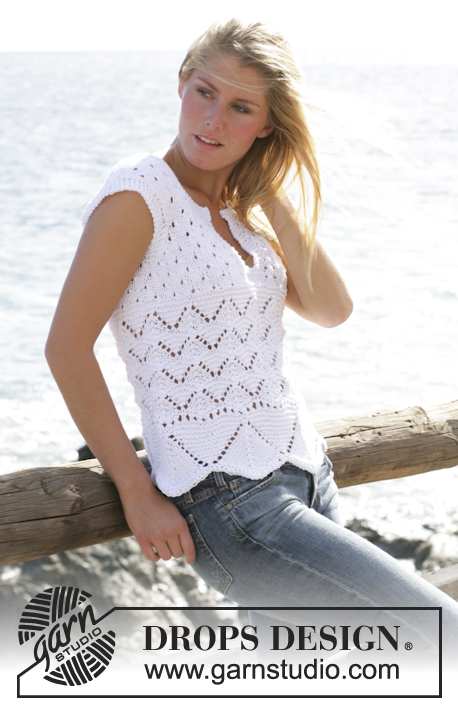
DROPS short-sleeved top with round yoke in “Muskat”
DROPS 101-30 |
|||||||||||||
|
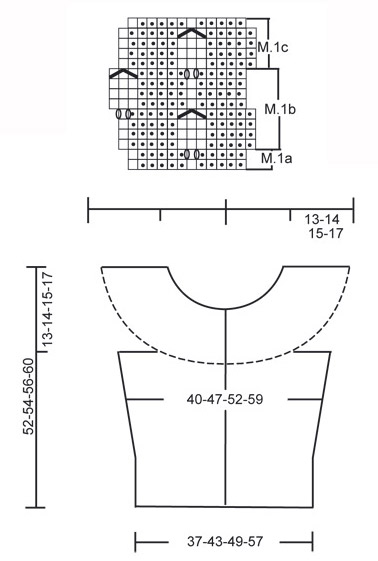
Knitting tension: 21 sts x 28 rows on needle size 4 mm in stocking stitch = 10 x 10 cm Pattern: See diagram M.1. Note! First row in diagram is worked from WS. The pattern in diagram is seen from the RS. Garter st, back and forth on needle: Knit all rows. Increasing tip (apply to P sections): Inc in the last st before the next K section (to make the inc less noticeable). Diagonal pattern on front pieces: Insert a marking thread (MT) in the last K st on front piece before left sleeve and 1 MT in the first K st on front piece after right sleeve. Dec and inc to create the diagonal pattern on every other row a total of 24-30-36-36 times as follows: Left side: Beg 2 sts before st with MT: P2 tog, K1 (= st with MT), K 2 sts in next st. Right side: Beg 1 st before st with MT: K 2 sts in this st, K1 (= st with MT), P2 tog. Incorporate new sts in Rib K1/P5 as you go along. Buttonholes: Make buttonholes on right front band from RS. 1 buttonhole: K 2nd and 3rd front band st tog and make a yo. Make buttonholes when piece measures: Size S: 1, 9, 17, 25, 33 and 41 cm Size M: 1, 8, 15, 22, 29, 36 and 43 cm Size L: 1, 9, 17, 25, 33, 41 and 49 cm Size XL/XXL: 1, 9, 17, 25, 33, 41 and 49 cm Note! The pattern at the bottom of yoke on front piece will differ slightly from the pictured version. If you would like the pattern to be like the pictured (i.e. identical on both sides of the front bands), then work M.1 mirrored from mid back and work the pattern diagram from left to right until 11 sts remain. This will create two identical pattern repeats next to each other on back piece. __________________________________________________________________ TOP Worked back and forth on circular needle from mid front, and from top down. Cast on 139-155-171-203 sts (inclusive 5 front band sts each side) on needle size 4 mm. Insert 4 marking threads (MT) in piece as follows: MT-1 after 21-25-29-33 sts, MT-2 after 52-56-60-72 sts, MT-3 after 87-99-111-131 sts, MT-4 after 118-130-142-170 sts. The sts between MT-1 and MT-2 and between M-3 and MT-4 mark the sleeves = 31-31-31-39 sts. Knit 8 rows garter st – remember to cast off for buttonholes – see above. At the same time on the last row inc evenly as follows: 5 sts on left front piece, 10 sts on back piece and 5 sts on right front piece = 159-175-191-223 sts (do not inc on sleeve sts). Work a further 2 rows in garter st and work next row as follows (from RS): 5 garter sts (= front band), *K1, P3*, repeat from *-* and finish with K1 and 5 garter sts (= front band). Work the front band in garter st throughout. Continue like this until piece measures 4 cm. Now inc 1 st in every other P section – see Increasing tip – (= K1, P4, K1, P3). When piece measures 6-6-6-7 cm inc 1 st in the other P sections (= K1, P4) = 196-216-236-276 sts. Continue until piece measures 8-8-8-10 cm and now inc 1 st in every other P section (= K1, P5, K1, P4). When piece measures 10-10-11-13 cm inc 1 st in the other P sections (= K1, P5) = 233-257-281-329 sts. When piece measures 11-12-13-15 cm work 6 rows garter st on 47-47-47-59 sts each side between marking threads (= sleeves). Now cast off 47-47-47-59 sts each side in Rib, K1/P1, (= sleeves) = 139-163-187-211 sts left on back and front pieces. On next row cast on 17-19-19-21 sts each side over the cast off sts (= armholes) = 173-201-225-253 sts. Work next row as follows from RS: Size S + M + L: 5 garter sts, *K1, P5*, repeat from *-* on 30-36-42 sts, K1, P 8-9-9, K1 (insert a MT in this st = mid side), P 8-9-9, *K1, P5*, repeat from *-* on 66-78-90 sts, K1, P 8-8-9, K1 (insert a MT in this st = mid side), P 8-8-9, *K1, P5*, repeat from *-* on 30-36-42 sts, 5 garter sts. Size XL/XXL: 5 garter sts, *K1, P5*, repeat from *-* on 48 sts, K1, P 5, K1, P9 (insert a MT in the 5th P st = mid side), K1, P5, *K1, P5*, repeat from *-* on 102 sts, K1, P5, K1, P9 (insert a MT in the 5th P st = mid side), K1, P5, *K1, P5*, repeat from *-* on 48 sts, 5 garter sts. Continue with K over K and P over P. Read all of the following section before knitting it! At the same time when piece measures 6-4-2-3 cm from MT at sides beg inc and dec for diagonal pattern on front pieces – see above. At the same time when piece measures 4 cm for all sizes from MT at sides dec 1 st (by P 2 tog) on both sides of each MT on every 7-6-6-13 cm a total of 3-4-4-2 times = 161-185-209-245 sts. Continue with K over K and P over P until piece measures 27-28-29-31 cm from MT at sides. Where the diagonal pattern is now completed there is an extra st (the one that has been moved from the side). Dec this st. At the side (where the st was moved from) cast on 1 new st in order that the pattern fits. Now work next row as follows (from WS): 5 garter sts, P1, M.1A until 11 sts left on row. Work these 11 sts as follows: K5, P1, 5 garter sts. After 1 vertical repeat of M.1A continue in M1.B. Knit 3 vertical repeats of M.1B and work 1 vertical repeat of M.1C. Piece now measures approx 38-39-40-42 cm from MT at sides. Work 1 cm with K over K and P over P and cast off. Piece measures approx 52-54-56-60 cm. Assembly: Sew on buttons. |
|||||||||||||
Diagram explanations |
|||||||||||||
|
|||||||||||||
|
|||||||||||||
|
Have you made this or any other of our designs? Tag your pictures in social media with #dropsdesign so we can see them! Do you need help with this pattern?You'll find tutorial videos, a Comments/Questions area and more by visiting the pattern on garnstudio.com. © 1982-2024 DROPS Design A/S. We reserve all rights. This document, including all its sub-sections, has copyrights. Read more about what you can do with our patterns at the bottom of each pattern on our site. |
|||||||||||||


With over 40 years in knitting and crochet design, DROPS Design offers one of the most extensive collections of free patterns on the internet - translated to 17 languages. As of today we count 304 catalogues and 11422 patterns - 11422 of which are translated into English (UK/cm).
We work hard to bring you the best knitting and crochet have to offer, inspiration and advice as well as great quality yarns at incredible prices! Would you like to use our patterns for other than personal use? You can read what you are allowed to do in the Copyright text at the bottom of all our patterns. Happy crafting!
Comments / Questions (27)
I’m knitting the L size. I was at 225, and further reducing (p2tog on each side of mid underarm st) to 209. \r\nI would like to stay as close to 225 st as possible (thick waistline). What number can I reduce to that will accommodate the m1a,b,and c pattern properly. I calculated 221 as a possible number but would appreciate your expertise. ( I used calculation 221-17=204/12=17) Thank you again!
02.06.2022 - 20:27DROPS Design answered:
Dear Lisa, yes, that's correct. Before starting the pattern M.1a, the number of stitches has to be a multiple of 12 stitches + 17 stitches. For example, 209. The next multiple will be 221, as you calculated. This means that you only need to decrease once (1 stitch on each side of each marker). Please remember to select “question”, instead of “comment” when posting your questions, so that we may answer you sooner. Happy knitting!
04.06.2022 - 17:46Thank you in advance for your help. I’m beginning the diagonal work.( every other row) Can you please clarify. Should I be doing the dec. and inc. diagonal stitches in the right side ( the k1,p5 side) or on the wrong (p1,k5 side). :( I’m often confused about the left sleeve right sleeve guidance. (Is it ‘Left’ as I look at the front of the garment on a friend or left as I’m wearing the garment. Please excuse my confusion. Thank you again! :)
29.05.2022 - 01:51DROPS Design answered:
Dear Lisa, right and left are as if you were wearing the garment. Since you increase on purl sections (p5) you increase on RS. Unless otherwise stated, most garments have increases/decreases worked on the RS. Happy knitting!
29.05.2022 - 22:40Near beginning of project “ Work a further 2 rows in garter st and work next row as follows (from RS): ” ‘from’ ...do you mean I just left the RS and and now beginning on the WS ? Or that after these 2 garter rows I am now ON the right side. I need to pull back if I’ve switched sides along the way. Thank you.
11.05.2022 - 19:25DROPS Design answered:
Dear Lisa, this means that you are working on the right side after the 2 garter rows. So you continue working as follows, on a row on the RS. Happy knitting!
11.05.2022 - 21:52Os aumentos/ diminuições das partes da frente são feitos em todas as carreiras no direito ou carreira sim carreira não no direito?
05.09.2015 - 14:53DROPS Design answered:
Tanto os aumentos como as diminuições são feitos carreira sim carreira não pelo direito da peça. Bom tricô!
10.09.2015 - 11:32Ich vermisse eine Massangabe für den Kragen, bzw. den Halsausschnitt, habe bis jetzt ca. 12 cm gestrickt, denke, dass der Kragen viel zu weit ist, kann ihn aber nicht messen, weil in euerer Skizze keine Anhaltspunkte sind.
23.07.2015 - 18:02DROPS Design answered:
Sie haben recht, es fehlen die Zahlen in der Skizze. Ich leite das weiter, damit es ergänzt wird. Anhand der Maschenprobe errechnet müsste der Halsausschnitt in Größe S einen Gesamtumfang von 66 cm haben. Er fällt ja auch recht weit aus, wie Sie auf dem Foto sehen.
28.07.2015 - 13:42Thanks so much for your help with the diagonal pattern. I now have one more question about the diagram: what is meant by "vertical repeat"? Does that mean repeat the whole (M.1a, M.1b, M.1c) section? For example, section M.1b shows 8 rows. Does "Work 3 vertical repeats" mean I'll do 24 rows? I don't think it's possible to repeat M.1a, since the yarn overs in the first right-side row need to be followed by 3 purl stitches (as shown in the first row of section M.1b). Thanks again!
04.07.2015 - 20:32DROPS Design answered:
Dear Laura, when you work 1 vertical repeat of M.1a, you work the 2 rows in M.1a only. Then you work M.1b (= 8 rows) a total of 3 times (= 24 rows), then work M.1c (= 5 rows). Happy knitting!
06.07.2015 - 10:01I'm having trouble with the diagonal pattern on the front pieces. Does the marker stay in the same stitch, or do I move it as I repeat the increase/decrease rows? (And, if so, in which direction?) What effect am I trying to achieve here? Do you have a close-up picture of this portion of the garment? Thanks so much for your help!
01.07.2015 - 19:33DROPS Design answered:
Dear Laura, marker stays in the same st, you continue dec and inc to create the diagonal pattern on both front pieces - see "Diagonal pattern on front pieces" at the beg of the pattern. Happy crocheting!
02.07.2015 - 09:53Que voulez vous dire par "mettre un marqueur" Merci pour votre aide.
27.04.2013 - 19:14DROPS Design answered:
Bonjour Madame Toupance, on place un marqueur pour avoir un repère pour ensuite faire, en fonction du modèle, des diminutions, des augmentations etc.... pour un fil marqueur voir ci-dessous, pour un anneau marqueur cf index vidéothèque. Bon tricot !
29.04.2013 - 07:57Hallo:) Drops 101-30 / Schräge habt ihr ein Video oder eine andere Erklärung als im Stickmuster? Hier habe ich das nich verstanden:( Danke
26.01.2013 - 18:25DROPS Design answered:
Hallo Frau Kauffreisen, leider gibt es genau zu dem Modell kein spezielles Video. Wir haben die Übersetzung aber überarbeitet, ist es jetzt verständlicher?
27.01.2013 - 17:56Judy, The M.1b is a pattern that is repeated all the way around. So the yo, K1, yo is repeated. As you can see the two new sts are in the pattern on next row. If you need further help please contact the shop were you bought the yarn, and they should be able to show you.
04.06.2008 - 20:50