Comments to DROPS 59-6
![]() Freya wrote:
Freya wrote:
Edit to my comment I just left- at the end I meant I only have enough for pattern 1 and 5 with 3 extras on each side (including the added seam stitch) . Thanks!
03.04.2024 kl. 19:44:DROPS Design answered:
Dear Mrs Freya, if you get the 28 sts + the 2 new sts for seam allowance you should just have the pattern working: 1 edge stitch (new stitch cast on), P2 ,(remaining 2 sts from previous M.2), M.1 (12 sts), M.5 (12 sts) - just as before, P2 (remaining 2 sts from previous M.2) and 1 edge stitch (new stitch cast on) = 1+2+12+12+2+1=30 sts. Happy knitting!
04.04.2024 kl. 08:16:
![]() Kari Nilsen wrote:
Kari Nilsen wrote:
Jeg skal felle til ermtopp, men skjønner ikke , fell i hver side 5-4(6-5-5-5)m x 8-10 (7-9-10-10) og deretter 9-12 (12-9-6-6)m x 1. Da skal det være igjen 28 m Takknemlig for hjelp til dette
22.02.2024 kl. 22:35:DROPS Design answered:
Hei Kari. Når du skal felle til ermtopp har du allerede felt 4 masker i alle str og har nå 126-132 (136-136-140-140) masker. Videre felles det til ermtopp i hver side på hver 2.p: 5-4 (6-5-5-5) masker x 8-10 (7-9-10-10) ganger = 40-40-42-45-50-50 masker i hver side = 80-80 (84-90-100-100) felte masker. Så skal det felles 9-12 (12-9-6-6) masker x 1 gang i hver side = 18-24 (24-18-12-12) felt masker. Du har nå felt tilsammen 98-104 (108-108-112-112). Du hadde 126-132 (136-136-140-140) masker og har felt 98-104 (108-108-112-112) masker = 28-28 (28-28-28-28) masker. mvh DROPS Design
26.02.2024 kl. 14:17:
![]() Kari Nilsen wrote:
Kari Nilsen wrote:
Hei. Er det riktig at det bare er igjen 8 masker etter ferdig felling på ermtopp? Det er for voksen størrelse
03.02.2024 kl. 09:34:DROPS Design answered:
Hei Kari. Ja, det stemmer. Men husk genseren har sadelskulder, så de 8 maskene du har til slutt blir liggende bak skuldren. mvh DROPS Design
09.02.2024 kl. 08:28:
![]() Catherine wrote:
Catherine wrote:
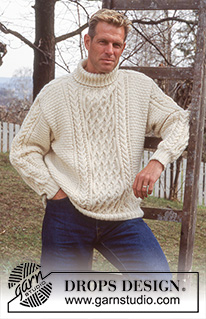
Hi, unfortunately my son did not get his sweater for Christmas.... I have worked out all the cables, but cannot get the sizing right. He is in his early twenties, but has a size 87cm chest measurement and needs a length if 64 cm.... Even the men's small seems to big. I must be measuring wrong somehow? I have frogged my work 4 times know to try different sizes and just want to get it right. Any ideas on what I need to do or best size? Many thanks
23.07.2023 kl. 23:03:DROPS Design answered:
Dear Catherine, this model is quite wide, not too tight to the body, which is why the measurements are quite big. You can see in the photo that the model has quite a loose fit for this sweater. In any case, you can use the width of the child version of the sweater, which should have the correct measurements for the chest indicated (for example, the third or 4th sizes) for the placement of the cable pattern. And then just work the length indicated for the men´s sizes or the desired length. Happy knitting!
26.07.2023 kl. 15:49:
![]() Fischers Fancy wrote:
Fischers Fancy wrote:
Guten Tag, leider verstehe ich folgendes Stück am Anfang der Anleitung nicht. Es soll ein XL Pullover werden. Muster wie folgt stricken: * 28-36 (32-36-40-44) M. von M.3, M.2, M.4, M.2, 28-36 (32-36-40-44) M. von M3 *, von *-* über das Rückenteil wiederholen. Gibt es eine deutschsprachige telefonische Beratung? Ist oft besser beim erklären. Mfg
10.07.2023 kl. 21:24:DROPS Design answered:
Liebe Fischers Fancy, M.2, M.3 und M.4 sind die Diagramme, die Sie unter der Musteranleitung finden. Für Größe XL wie folgt stricken: M3 über 40 Maschen, M2 1 Mal, M4 1 Mal, M2 1 Mal, M3 über 40 Maschen. Auf die gleiche Weise mit den hinteren Maschen wiederholen. Weitere Informationen zum Stricken der Diagramme finden Sie in der folgenden Lektion:https://www.garnstudio.com/lesson.php?id=68&cid=9. Sie können die Hilfe des Ladens, bei dem Sie das Garn gekauft haben, in Anspruch nehmen. Viele Spass beim stricken!
27.07.2023 kl. 10:17:
![]() Lisbeth Hyldgaard wrote:
Lisbeth Hyldgaard wrote:
Ved montering skal ærmer syes med maskering eller ….? Hvad er pænest og mest holdbart?
24.05.2023 kl. 08:13:DROPS Design answered:
Hej Lisbeth, nederst i opskriften har vi valgt 2 monteringsvideoer ud som kan bruges til denne model :)
24.05.2023 kl. 13:53:
![]() Catherine wrote:
Catherine wrote:
Hi, this will be the first time I have done cables but my son has his heart set on this sweater for Christmas! I do have a question about the increase after the garter stitch - he is a S/M so it looks like I have to increase by 100 stitches after I have done the first 4 rows of garter, is this correct, increase by 100 before the next 2 rows garter st? What is the best way to do this? Many thanks
14.11.2022 kl. 18:28:DROPS Design answered:
Hi Catherine, To work out how to increase evenly, divide the number of stitches by the number of increases (236/100 = 2.6). So here you increase by making 1 yarn over after alternately the 2nd and 3rd stitches on the whole round. On the next round work the yarn overs twisted (work in the back loop) to avoid holes. Happy knitting!
15.11.2022 kl. 07:09:
![]() Sharon Shaw wrote:
Sharon Shaw wrote:
Don’t have a video showing how to see in the sleeves do you? Have only ever done this with a plain jumper? Thanks
04.05.2022 kl. 17:09:DROPS Design answered:
Dear Mrs Shaw, there aren't video showing how to knit this kind of sleeve, you work both sleeves to armhole the same, but then you will have to work top of each sleeve a different way to shape shoulders at the same time, cast off as explained in the pattern. You then sew the sleeves together mid on back piece. Then sew the back piece along the last part of sleeve and the cast off sts for each shoulder on front piece along the other side (shorter side) on top of sleeve. Happy knitting!
05.05.2022 kl. 08:34:
![]() Sharon Shaw wrote:
Sharon Shaw wrote:
Sorry another quick question I have wrong side facing me when it is telling me to bind off 12 stitches on the right side, a little confused is this still on right even though wrong side facing me? Thanks
16.04.2022 kl. 09:52:DROPS Design answered:
Dear Sharon, it means in the side of the garment that is in the right hand (not the RS). Happy knitting!
17.04.2022 kl. 12:00:
![]() Sharon Shaw wrote:
Sharon Shaw wrote:
Hi, Am coming towards the end of my fishers fancy jumper, am at the top of the sleeve having worked the 18 cm shoulder part, when I carry on on the 8 sts am I still working in pattern or in garter stitch or knit a row purl a row? Thanks for your help, the pattern is beautiful.
15.04.2022 kl. 14:52:DROPS Design answered:
Dear Sharon, you continue working according to the pattern. Happy knitting!
15.04.2022 kl. 19:59:
![]() Sharon Shaw wrote:
Sharon Shaw wrote:
Please can you clarify when I get to the bit where it says work front and back separate do I then need to change to straight needles I presume? Thanks for you help.
14.02.2022 kl. 22:12:DROPS Design answered:
Hi Sharon, No, you can continue working with circular needles when working back and forth. Happy knitting!
15.02.2022 kl. 08:21:
![]() RIFFET wrote:
RIFFET wrote:
Que veut dire monter des mailles sur les aiguilles double pointes, joindre et placer un marqueur à la jonction . Comment fait-on pour joindre sur des aiguilles double pointes ?
28.05.2021 kl. 13:22:DROPS Design answered:
Bonjour Mme Riffet, cette vidéo montre comment monter des mailles sur des aiguilles doubles pointes et tricoter en rond et devrait ainsi vous aider à visualiser ce que l'on doit faire pour commencer les manches. Bon tricot!
28.05.2021 kl. 15:15:
![]() Marja Steinhoff wrote:
Marja Steinhoff wrote:
Merkkien selitysten kohdassa on virhe. M4 osiota koskevassa kohdassa. Alimman merkin selityksen kohdalla kuuluisi olla: Siirrä 1 s apupuikolle työn taakse, 3 oikein, neulo apupuikon 1 s nurin.\r\nAiheutti päänvaivaa kunnes älysin tarkistaa saksankielisen käänöksen\r\nTuo malli on ihana ja olen ihastunut Drops lankoihin.Ohje voisi olla selkeämpi: kun kuvioiden neulomista kerrotaan (etu-ja takakappale) voisi kuvioiden vaihtuminen tekstissä erotella selvemmin
11.05.2021 kl. 12:14:
![]() Melissa wrote:
Melissa wrote:
I am almost done with the first sleeve and am stuck because of the wording of the directions. What does "dec 6 its evenly distributed over the outer 18 its on the ride side" mean? The word "outer" is throwing me off, I think. Can you clarify the next line of the pattern as well: "On the next row bind off the outer 12 its on the right side". Thanks.
25.04.2021 kl. 20:40:DROPS Design answered:
Dear Melissa, to get the piece keeping correct width, you have do decrease stitches in the cables, you will decrease (from WS) 6 sts on the right side of piece (seen from RS), this means for right sleeve you will decrease from WS in the 18 sts at the end of the row (with P2 tog and not K2 tog), and then, at the beg of next row from RS you will cast off the first 12 sts. (these 12 sts are on the right side of piece, seen fro RS). Happy knitting!
26.04.2021 kl. 08:12:
![]() Carmen Köhler wrote:
Carmen Köhler wrote:
Guten Tag, ich würde gern diesen Pullover stricken, aber ein anderes Garn verwenden. Möglichst keine reine Wolle, weil er maschinenwaschbar sein sollte. Welches Garn können Sie mir empfehlen? Vielen Dank
16.04.2021 kl. 17:12:DROPS Design answered:
Liebe Frau Köhler, versuchen Sie unseren Garnumrechner, so finden Sie Alternative - DROPS Karisma is selbst Superwash und ist maschinenwaschbar - hier finden Sie alle Garne von der Garngruppe B, die Superwash sind. Viel Spaß beim stricken!
19.04.2021 kl. 07:31:
![]() Barbara wrote:
Barbara wrote:
I have a very hard time with cable stitch charts. Is there anyway to get written instructions for the charts?
11.04.2021 kl. 03:34:DROPS Design answered:
Dear Barbara, no, there are no written out instructions for the diagrams, not only because the patterns are available in a number of languages, but also, because we believe that with diagrams, you not only see the very next step, but also, how stitches and rows relate to each other en large. We do have a lesson on how to follow diagrams HERE, and you can always ask for help (in person, or over the phone) in the store where you bought your DROPS yarn from. Happy Knitting!
11.04.2021 kl. 03:40:
![]() Le Dantec Louisa wrote:
Le Dantec Louisa wrote:
Bonjour, Les diminutions aux emmanchures se font-elles directement au niveau des marqueurs ou faut-il laisser 1 maille voire 2 mailles avant de les faire? Egalement, les diminutions se tricotent-elles à l'endroit? Je vous remercie pour l'attention que vous porterez à ma demande. Cordialement
14.02.2021 kl. 15:15:DROPS Design answered:
Bonjour Mme Le Dantec, les mailles des emmanchures sont ici rabattues, mais vous pouvez les diminuer à 1 ou 2 mailles du bord, comme vous le souhaitez. Bon tricot!
15.02.2021 kl. 09:38:
![]() Annukka Hamalainen wrote:
Annukka Hamalainen wrote:
Hei, suomenkielisessä ohjeessa ei ole ruutupiirroksia ollenkaan. Maalasin ja tulostin ne norjankielisestä, mutta no, kuvioiden selitykset ovat norjaksi. Olisiko mahdollista saada selitykset suomeksi?
08.02.2021 kl. 16:52:DROPS Design answered:
Hei, nyt piirrokset ja niiden selitykset näkyvät.
08.02.2021 kl. 17:04:
![]() Moór Margit wrote:
Moór Margit wrote:
Üdvözlöm! Sajnos a diagrammok nem jelennek meg a gépemen, és a nyomtatásban sem. Hol találom?
05.02.2021 kl. 09:32:
![]() Hilde Tavernier wrote:
Hilde Tavernier wrote:
Goedenavond Ik ben nog maar net begonnen met het breien maar vraag me af als ik na de 7 cm boordsteek het meerderen van de steken kan overslaan? Dit is een ouder patroon en de mode is nu toch smaller. Door nu naalden 3,5 te gebruiken zal de trui zowiezo iets breder uitvallen.
20.01.2021 kl. 22:18:DROPS Design answered:
Dag Hilde,
Je bent natuurlijk vrij om het patroon aan te passen naar eigen wensen, maar houd er dan rekening mee dat je ook anders uitkomt met het patroon. Zorg ervoor dat de kabels in het midden van de panden komen.
23.01.2021 kl. 11:16:
![]() Le Dantec Louisa wrote:
Le Dantec Louisa wrote:
Bonjour, Lorsque j'applique le diagramme avec les explications suivantes "glisser 3 m sur l'aiguille auxiliaire derrière l'ouvrage, tricoter 1 m env, reprendre les 3 m en attente et les tricoter à l'end" je n'obtiens pas le motif escompté. N'y aurait-il pas une erreur? je vous remercie. Cordialement
13.01.2021 kl. 13:36:DROPS Design answered:
Bonjour Mme Le Dantec, effectivement, il fallait lire: glisser 1 m sur l'aiguille auxiliaire derrière l'ouvrage, tricoter 3 m end, reprendre la m en attente et la tricoter à l'env - la légende de ce symbole (le 6ème) a été modifiée, merci pour votre retour, bon tricot!
13.01.2021 kl. 15:33:
![]() Melissa wrote:
Melissa wrote:
There are 2 women's sizes and 4 men's sizes but only 4 sizes listed for "finished measurements". Can you please clarify what the chest size is for each of the 6 sizes?
06.01.2021 kl. 12:32:
![]() Ela wrote:
Ela wrote:
I'm doing the child size 2 sweater and I'm confused about the sleeve. The sweater has 54 stitches and then they introduce the pattern: 13 stitches of (M.3), + 28(M.2)+ 12 (M.1), +12 (M.5),+ 28 (M.2) +13 stitches of (M.3). Which is 106 stitches? More than 54? What am I missing? Thanks!
06.01.2021 kl. 04:04:DROPS Design answered:
Hi Ela, Your stitches are divided between 13 stitches in M.3, P2, M.1 (12 stitches), M.5 (12 stitches), P2 and finish with 13 stitches in M.3 = 54 stitches. Happy knitting!
06.01.2021 kl. 06:44:
![]() Cathy wrote:
Cathy wrote:
How would you suggest evenly distributing the 44sts increase over the 164sts of the kids size 2, after waistband ribbing is complete
05.01.2021 kl. 20:13:DROPS Design answered:
Hi Cathy, 164/44= 3,72. So you should increase after alternating every 3rd and 4th stitch. Please also see the lesson HERE. Happy knitting!
05.01.2021 kl. 20:26:
![]() RIVET Claude-luc wrote:
RIVET Claude-luc wrote:
Bonjour,pourriez vous m'indiquer une boutique ou je pourrais acheter se modèle
25.11.2020 kl. 16:17:DROPS Design answered:
Bonjour Mr Rivet, cliquez sur le lien souligné dans une des réponses précédentes ou bien sur le menu magasins DROPS en haut de la page pour accéder à la liste des magasins et leurs coordonnées.
25.11.2020 kl. 16:46:
![]() RIVET wrote:
RIVET wrote:
Bonjour,ou pourais-je acheter cet article car je susi tres intéressé,ainsi que le prix.merci d'avance.
24.11.2020 kl. 18:31:DROPS Design answered:
Bonjour Mme Rivet, comme expliqué précédemment (voir réponse du 23/11), nous ne proposons que les explications des modèles présentés, contactez l'un des magasins DROPS en France - ils pourront peut-être vous mettre en contact avec une tricoteuse qui pourra vous le faire. Merci!
25.11.2020 kl. 07:18:
![]() RIVET wrote:
RIVET wrote:
Bonjour,ou pourais-je acheter se modèle
23.11.2020 kl. 11:45:DROPS Design answered:
Bonjour Mme Rivet, nous ne proposons que les explications, mais vous pouvez vous adresser (même par mail ou téléphone) à l'un des magasins DROPS, on pourra fort probablement vous aider ou vous recommander quelqu'un.
23.11.2020 kl. 11:51:
![]() Melissa wrote:
Melissa wrote:
Which pattern do I use to determine gauge?
15.11.2020 kl. 14:28:DROPS Design answered:
Dear Melissa, knitting tension is worked with stocking stitch and larger needles. Happy knitting!
16.11.2020 kl. 09:02:
![]() Lella wrote:
Lella wrote:
Sleeves.... please, what does this mean? Change to larger double pointed needles and establish pattern as follows: 2-2 (4-4-6-6) sts of Pattern 3, Pattern 2, Pattern 1, Pattern 5, Pattern 2, 2-2 (4-4-6-6) sts of Patt
26.08.2020 kl. 02:18:DROPS Design answered:
Dear Lella, pattern 1, 2, 3 etc... refer to the diagrams M.1, M.2, M.3 etc... this means you will work 2 or 6 sts (see size) as shown in diagram M.3, then work diagram M.2 (= 28 sts), diagram M.1 (12 sts), diagram M.5 (= 12 sts), M.2 (= 28 sts) etc... Happy knitting!
26.08.2020 kl. 08:21:
![]() Shawn Holland wrote:
Shawn Holland wrote:
This is my first sweater. I am now at the part of the pattern (knitting Adult size after reaching 16 1/8” of body) and trying to understand the next steps. Between the bind off stitches, do I continue to knit in pattern/chart (in my case, 164 sts between)?
20.07.2020 kl. 18:39:DROPS Design answered:
Dear Mrs Holland, yes correct, the 164 sts for front and back piece have to be worked as before. Just make sure that the next row will be worked either from RS or from WS so that the cables will always be from RS. Happy knitting!
29.07.2020 kl. 08:25:
![]() Shawn Holland wrote:
Shawn Holland wrote:
After ribbing and increases, I have 336 stitches per the pattern. Next step is to work 32 stitches of each of the following patterns in sequence (if I am understanding correctly); Pattern 3, Pattern 2, Pattern 4, Pattern 2 and Pattern 3. Then place marker & repeat. I've done two rounds, and I end up with 16 leftover stitches after working the second set of 32 stitches from pattern 3. I went ahead and started using Pattern 3 again, but it doesn't seem correct. Please advise. Thank you!
13.05.2020 kl. 06:00:DROPS Design answered:
Dear Mrs Holland, work the 336 sts as follows: *32 sts as in diagram M.3, then work diagram M.2 (=28 sts), then work diagram M.4 (=48 sts), then work diagram M.2 again (= 28 sts) and work 32 sts as in diagram M.3*, repeat from *-* = 32+28+48+28+32=168x2= 336 sts. Happy knitting!
13.05.2020 kl. 09:01:
![]() Lynne wrote:
Lynne wrote:
Once I am down to 8 stitches at the top of the sleeve, the pattern says to knit until the work measures 26 cm. What stitch do I use?
19.04.2020 kl. 02:16:DROPS Design answered:
Dear Lynne, for the saddle part of the sleeve, you should continue to knit the cable pattern as before. Happy Knitting!
19.04.2020 kl. 20:44:
![]() Shawn Holland wrote:
Shawn Holland wrote:
The instructions for the gauge swatch are unclear to me. Of the three charts on page 8 of the pattern, which one is “Pattern 3” that the gauge instructions refer to?
12.04.2020 kl. 02:15:DROPS Design answered:
Dear Shawn. The gauge is calculated by working the chart M.3 (below the sleeve in the sketch). Happy knitting!
12.04.2020 kl. 17:52:
![]() Le Vourch wrote:
Le Vourch wrote:
Bonjour j\'arrive aux diminutions de la manche (pull homme, taille M) (2+4+10+12)x2 mais je me retrouve avec 80 mailles et non 28. Je ne comprend pas comment poursuivre la fin de la manche.\r\n\r\nCordialement.
05.01.2020 kl. 08:25:
![]() Lynne wrote:
Lynne wrote:
I have reached the part on the sleeve where I am supposed to begin binding off. Why is the women's s/m 46 cm when the women's m/l is only 45cm when you begin binding off? Also, before that, does it really make a difference if I increased every 4th row as opposed to alternately every 4th and 5th row?
04.01.2020 kl. 22:04:DROPS Design answered:
Dear Lynne, the sleeves are longer in smaller sizes since the sleeve cap will be then shorter - see measurement chart. Increasing every 4th round instead of alternately every 4th and every 5th round will require less rows to achieve all increases. Happy knitting!
06.01.2020 kl. 08:17:
![]() LynneCT wrote:
LynneCT wrote:
I am still confused. When you say the knit previous stitch of diagram at the beginning, and the next stitch of the diagram at the end, which stitches are those? Which pattern?
17.12.2019 kl. 02:57:DROPS Design answered:
Dear LynneCT, this depends on the first and last stitch worked in the diagram, just mark these stitches in the diagrams so that you know which is the first stitch at the beg of the round and the last stitch at the end of the round. If the first stitch to work is the first st in the diagram, the increase st should be worked as the last stitch this diagram so that it continue towards the right. At the end of the round, work the increase st as next st in diagram, should the last stitch be the last stitch in diagram, you will then have to work the inc st as the first stitch on the right so that pattern continue to the left. Happy knitting!
17.12.2019 kl. 09:35:
![]() LynneCT wrote:
LynneCT wrote:
I am knitting the sleeves. women's size Small. After I increase the first time after the ribbing, where I am supposed to knit 2 stitches of Pattern 3, I now have an extra stitch. Do I knit the last stitch of Pattern 3, and then the first 2 stitches? The same for the end of the row. Do I knit the first 3 stitches of Pattern 3?
12.12.2019 kl. 21:53:DROPS Design answered:
Dear LynneCT, at the beg of the round you work the new stitches as the previous stitch in diagram and at the end of the round you work the new stitches as the next stitch in diagram, so that pattern won't fit mid under sleeve but will grow from the P2 towards mid under sleeve on each side. Happy knitting!
13.12.2019 kl. 08:22:
![]() Peggy T wrote:
Peggy T wrote:
I am having trouble with binding off about knitting Women's S/M. I am working the front side. I deceased 21 st over the center 56, then bound off center 35. I next bound off 2 st, then 1 st on each side. However, I only ended up with 41 st for shoulder, not 43. It only works out if I decrease 13 stitches over center 48, then bind off 2 st, then 1 each side. Am I doing something wrong?
13.11.2019 kl. 19:11:DROPS Design answered:
Dear Peggy T, you should have 148 sts after shaping armholes, then decrease 21 sts over the middle 56 sts = 148-21= 127 sts, then cast off the middle 35 sts = 92 sts/2 sides = 46 sts for each shoulder. You then bind off 2 sts 1 time + 1 st 2 times = 46-2-1=43 sts remain for shoulder. Happy knitting!
14.11.2019 kl. 09:39:
![]() Peggy T wrote:
Peggy T wrote:
I am confused about what to do when I reach the part on the body after the first bind off where it says knit the rest of the front and back separately. Do I work with 2 different balls of yarn?
03.08.2019 kl. 03:57:DROPS Design answered:
Hello Peggy. After you bind off for the armholes, you work back and front as two separate pieces. You can first work the front piece and once the front is finished, work on the back piece. If you prefer, you can work the two piece at the same time, but you will have to work with separate balls of yarn. Happy knitting!
03.08.2019 kl. 18:19:
![]() Gaëlle wrote:
Gaëlle wrote:
Bonjour, J'ai commencé la manche du tricot en taille M/L, mais, après les côtes et les 28 augmentations, arrivé au diagramme, je me retrouve avec 84 mailles à tricoter et des diagrammes à suivre pour 56 mailles. Pouvez-vous me fournir un rectificatif ? Cordialement.
29.07.2019 kl. 13:29:DROPS Design answered:
Bonjour Gaelle! Changez pour les aiguilles double pointes 3,5 mm et établissez le patron comme suit: 2 mailles du diagramme M3, diagramme M2, diagramme M1, diagramme M5, diagramme M2, 2 mailles du diagramme M3 = 84 mailles au total (2+28+12+12+28+2). Bon tricot!
29.07.2019 kl. 17:20:
![]() Fabienne wrote:
Fabienne wrote:
Bonjour,tout d'abord trop beau votre pull,je le fais pour ma petite fille de 2 ans , mais quand j arrive au repartition des diagrammes ,je n'ai que 76 mailles au lieu des 104( 12m diagramme M3.,diagramme M2 complet donc 28m., diagramme M1 donc 12m,diagramme M5 donc 12m. et 12m. diagramme M3 .total 76 mailles ...) avez vous oublier un diagramme ? ou ai-je oublié une indication ? merci . cordialement
09.04.2019 kl. 07:52:DROPS Design answered:
Bonjour Fabienne, il manque en fait un M.2, on doit tricoter ainsi: 12 m de M.3, M.2, M.1, M.5, M.2, 12 m de M.3 - la correction va être faite, merci. Bon tricot!
09.04.2019 kl. 09:32:
![]() Gabi wrote:
Gabi wrote:
Hallo, ich kann die Diagramme für die Muster nicht finden, vielleicht liegts am Browser? Am PC kommt nur = r oder =l, am Handy immerhin noch ein Platzhalter für ein Bild, das Diagramm selber taucht leider nirgends auf. Können Sie helfen? Gruss, Gabi
09.09.2018 kl. 22:11:DROPS Design answered:
Liebe Gabi, wegen Wartungsarbeiten waren die Bilder vor einigen Stunden nicht verfügbar, aber alles ist jetzt wieder in Ordnung. Viel Spaß beim stricken!
11.09.2018 kl. 08:40:
![]() Øistein Høyde Braanen wrote:
Øistein Høyde Braanen wrote:
Hei :) Når man starter på mønstra nederst på bolen, står det for S/M at man skal strikke 32 m av de forskjellige mønstra. Dette går jo ikke opp i de tilsammen 336. Åssen skal maskene til overs strikkes? Hovedmønstret har 48 masker, skal jeg da bare strikke de 32 midterste? På bilda ser det jo ut som mønstra har forskjellig bredde..
03.02.2018 kl. 17:47:DROPS Design answered:
Hei Øistein. Nei, du skal strikke 32 masker av kun M.3, deretter de andre mønstrene. Du strikker slik: 32 masker av diagram M.3 + M.2 (= 28 masker) + M.4 (= 48 masker) + M.2 (= 28 masker) og så 32 masker av M.3 igjen (32+28+48+28+32 = 168 masker = Forstykket). Nå gjentas det som står mellom stjernene i oppskriften (*-*) på bakstykket. 168 masker forstykket + 168 masker bakstykket = 336 masker på omgangen. God Fornøyelse!
13.02.2018 kl. 14:14:
![]() Hilda Van Der Spoel wrote:
Hilda Van Der Spoel wrote:
Goedenavond, Ben nu toegekomen aan het minderen voor de armsgaten. Daarna moet ik de panden afzonderlijk verder breien. Dan vraag ik me af hoe ik dat moet doen omdat ik het onderstuk op de rondbreinaald steeds aan de goede kant heb gebreid. Moeten de afzonderlijke stukken ook op de rondbreinaald gebreid worden en zo ja hoe dan?
18.09.2017 kl. 19:49:DROPS Design answered:
Hallo Hilda, Bij heen en weer breien, brei je in dit patroon de teruggaande naalden (dit zijn de oneven naalden in het telpatroon) zoals de steken zich voordoen, dus als je op de heengaande naald de steek recht hebt gebreid, brei je hem nu averecht, en vice versa. Op deze oneven naalden hoef je geen steken op een kabelnaald te zetten.
24.09.2017 kl. 10:50:
![]() Gerry Zonneveld wrote:
Gerry Zonneveld wrote:
Goedemiddag, ik heb een vraag over model 59-6. Het betreft de 8 overgebleven steken van de mouw. Deze worden op een hulpdraad gezet en moeten bij de afwerking aan elkaar gemaasd worden. Ik zie wel maas instructievideo's, maar dat is niet met losse steken. Kunt u mij vertellen hoe ik de steken van beide panden aan elkaar kan mazen?
11.01.2017 kl. 13:10:DROPS Design answered:
Hoi Gerry. Hetzelfde principe. U maast de losse steken aan elkaar, dus de draad door de losse st halen
12.01.2017 kl. 15:01:
![]() Tricoteuse Bretonne wrote:
Tricoteuse Bretonne wrote:
Bonjour, je voudrais réaliser ce pull avec votre nouvelle PUNA. pour mon mari. Il mesure 1,86m et fait 118 de tour de poitrine, donc sa taille est XXL. A combien de pelotes de PUNA estimez-vous ce pull ?
20.04.2016 kl. 08:19:DROPS Design answered:
Bonjour Tricoteuse Bretonne, Karisma et Puna étant du même groupe, vous trouverez ici toutes les indications nécessaires pour calculer la quantité nécessaire en Puna. Bon tricot!
20.04.2016 kl. 08:26:
![]() Armony wrote:
Armony wrote:
Bonjour, J'arrive en haut de la première manche et j'ai un peu de mal à comprendre les explications, à partir de : Sur le rang avant que le travail ne mesure 16.5-17 (17-18-18-20) cm [6.5" - 6.75" (6.75" - 7" - 7" - 7-7/8")]........., Pouvez-vous m'éclairer ? Merci d'avance !
14.06.2015 kl. 11:32:Armony answered:
Je viens de voir que vous aviez déjà donné des éclaircissements à ce sujet ! Désolée d'avoir reposé la question ! Votre explication est très claire. Merci !
14.06.2015 kl. 11:34:
![]() Marjan Lautenslager wrote:
Marjan Lautenslager wrote:
Vervangende garens voor model 59-6
10.02.2015 kl. 19:28:DROPS Design answered:
Hoi Marjan. Kijk onder "GARENALTERNATIEVEN" bovenaan het patroon (rechts van MATERIAAL)
11.02.2015 kl. 15:55:
![]() Linda Galla wrote:
Linda Galla wrote:
Where are the patterns for 59-6? The pattern references 5 patterns but they are not shown. Also, there are 2 completely different pictures shown for the 1 pattern - which is the correct one?
22.01.2015 kl. 20:14:DROPS Design answered:
Dear Mrs Galla, you will find all diagrams to that pattern at the very bottom of the page, they are called M.1 to M.5 - please click here to read more about diagrams. Both pictures show same sweater, you see more details on sleeve on one of the picture, and on the 2nd picture, you see front panel. Happy knitting!
23.01.2015 kl. 10:47:
![]() Sara wrote:
Sara wrote:
M1 och M5 är en mindre del av M4, se längst ner!
21.07.2014 kl. 10:38:
![]() Elly Ingholt wrote:
Elly Ingholt wrote:
Hvor er M1 og M5 som skal strikkes til højre ærme. Jeg har skrevet opskriften ud fra nettet, men det er kun M2, M3 Og m4 som vises.
20.07.2014 kl. 22:15:DROPS Design answered:
Hej Elly. M.1 og M.5 er del af M.4: det er kablerne først og sidst i M.4.
21.07.2014 kl. 13:52:
![]() Ingrid wrote:
Ingrid wrote:
I love all DROPS patterns. You guys have AWESOME designs but the patterns themselves are confusing as hell. I'm an intermediate knitter but I spend so much time reading through the patterns just to make sense of them before I even start knitting. Sadly it makes me shy away from your patterns.Am I the only one?
09.07.2014 kl. 19:24:
![]() Pannier wrote:
Pannier wrote:
Les explications pour les manches ne sont pas claires, Continuez en patron ??? 6 diminutions sur les mailles les 18 mailles de l'extrémité??? pourriez vous me fournir quelques éclaircissements merci E. Pannier
06.12.2013 kl. 17:17:DROPS Design answered:
Bonjour Mme Pannier, les explications vont être revues. Sur les 30 m de la manche on tric.: 1m lis, 2m env, M1, M5, 2m env, 1m lis pendant 16.5-20 cm(cf taille), dim (sur l'env) 6 m au-dessus des 18 dernières m (= à droite, vu sur l'end). Au rang suivant, sur l'end, rab. les 12 premières m à droite. Diminuez ensuite 2 m au-dessus des 4 m suiv et rabattez 2 m à droite au rang suiv sur l'end, il reste 8 m pour le haut de la manche. Bon tricot!
06.12.2013 kl. 19:18:
![]() DROPS Deutsch wrote:
DROPS Deutsch wrote:
Das muss "hinter die Arbeit legen" heissen. Ich habe das gleich angepasst. Vielen Dank für den Tipp.
08.12.2011 kl. 09:57:
![]() Sylvana wrote:
Sylvana wrote:
"1 M auf eine Hilfsnadel vor die Arbeit legen, 3 re, 1 li von der Hilfsnadel" , wenn ich das stricke, ist auf der einen seite des zopfes ein faden vordem zopf, auf der anderen seite jedoch nicht, vielleicht ist dort ein fehler unterlaufen und es sollte heißen, 1 M auf eine Hilfsnadel hinter die Arbeit legen, 3 re, 1 li von der Hilfsnadel?
08.12.2011 kl. 00:23:
![]() Drops Design France wrote:
Drops Design France wrote:
Bonjour Lamrelle, les mesures finales indiquées correspondent au tour de poitrine du pull terminé (cf croquis en bas de page). La traduction des diagrammes se trouve au début des explications, dans le même ordre vertical que dans la légende. cordialement.
24.09.2010 kl. 11:04:
![]() Lamrelle wrote:
Lamrelle wrote:
Bonjour, modèle 59/6 : je ne comprends pas le diagramme qui n'a pas été traduit en français. - à quelles tailles correspondent les mesures finales notées en cms :notamment 128 cm? merci pour votre reponse cordialement
23.09.2010 kl. 20:30:
![]() DROPS Design DE wrote:
DROPS Design DE wrote:
Hallo, bis zum Armloch wird der Pullover rund gestrickt (es steht: Vorder- und Rückenteil), ab der Stelle: "Jetzt jede Seite einzeln fertig stricken" werden die Teile separat gestrickt. Dann ist auch das Vorder- und das Rückenteil separat beschrieben.
27.07.2010 kl. 08:24:
![]() Astrid Depper wrote:
Astrid Depper wrote:
Hallo Drops-Team, Ich habe eine Frage über den Männerpullover 59.6 wird das vorder-rückenteil miteinander gestrickt oder getrennt gestrickt . Das ist sehr kompliziert geschrieben.Ich habe schon Ahnung vom stricken aber dies ist sehr aufwendig und schwierig beschrieben. Würde mich freuen wenn sie mir etwas ausführlicher beschreiben würde. Vielen herzlichen grüße Astrid Depper. P.S habe schon viel von eure Seiten gestrickt mache so weiter bin sehr begeistert.
26.07.2010 kl. 15:15:Post a comment to pattern DROPS 59-6
We would love to hear what you have to say about this pattern!
If you want to leave a question, please make sure you select the correct category in the form below, to speed up the answering process.
Your email address will not be published. Required fields are marked *.
I’m knitting men’s S/M and on the right arm. I have cast off to have 28 stitches remaining and then inc. 1 on each side for seam. Next step says “Continue the pattern with 1 edge st, P 2, Pattern 1, Pattern 5, P 2, 1 edge st”, which adds up to 82 stitches (2 edges, 28 each P2, 12 each P1 and P5), not 30. I only have room for Pattern 2 (which is the continuation of my current knitting) and 2 edges. Pls let me know how to continue, thanks.
03.04.2024 kl. 19:40: